
A guide to get Eclipse set up with Python, PySide, Maya & PyMel for a sweet tech art development set up. This article is written assuming Windows 10 64 bit.
Getting the installers
Python
Get your version from here – https://www.python.org/downloads
I am installing – python-2.7.13.amd64.msi
Note: If you click the big yellow download button on the Python download page you will get the 32 bit version of Python.
PySide
PySide is a very nice UI framework (Qt) for Python. It also comes bundled with Maya.
We do want to install it for stand alone Python – link here – I grabbed PySide-1.2.2.win-amd64-py2.7.exe
Java Virtual Machine (Runtime Environment)
Sun Download Portal – Click on JRE (Download) → Agree to the licence agreement → I downloaded jre-8u92-windows-x64
Eclipse
The process of installing Eclipse and it’s plug ins has been vastly streamlined lately.
They even have a sweet step by step here which includes the download link. I am downloading Eclipse Neon 64 bit…
Getting up & running
Install Python
I just install Python straight to my C root – C:/Python27/
Install PySide
The installer should point to where you installed Python to.
Install Java Runtime Environment
Eclipse
Installing
Select weather you want any shortcuts and click install and accept the user agreement. When the installation finishes click on Launch.
I used the defaults for workspace directory.

Add PyDev
In the search box, type in PyDev.
Click Install Now to install PyDev. I uncheck PyDev Mylyn Integration to conserve my precious SSD space. Accept the licence agreement and finish the installation. You also need to trust the certificate. Restart Eclipse.

Add Perforce (Optional)
Again launch the marketplace Help → Eclipse Marketplace…
In the search box, type in Perforce. Click Install on “P4Eclipse. I uncheck everything but Perforce SCM Support (required). Accept the licence agreement and finish the installation. Restart Eclipse.
Showing the PyDev Perspective
Go to Window → Perspective → Open Perspective → Other…
Select PyDev and click ok. We can now close the Java perspective as we will not be needing it. Right click on the Java perspective and click Close.
Configure Interpreter(s)
Python
In the preference window go to PyDev → Interpreters → Python Interpreter.
Click New…
Give the interpreter a name and browse to the python.exe file (mine was in C:/Python27/python.exe)
I left all system libs checked.

Maya
Go to Window → Preferences. In the preference window go to PyDev → Interpreters → Python Interpreter.
Click New…
Give the interpreter a name and browse to the mayapy.exe file (mine was in C:Program FilesAutodeskMaya2014binmayapy.exe)
I left all boxes checked.
To get code completion on PyMel, click on the Predefined tab and click New.
Browse to “C:Program Files/Autodesk/Maya2014/devkit/other/pymel/extras/completion/pypredef” and click ok.
Note that on later versions of Maya (2016.5 and newer), the devkit folder is omitted from the install and you have to download it from the Autodesk App Store.
Search the app store for “Developer Kit” to find all the Maya version dev kits. Download the one for your version and put it somewhere and link the completion folder like I did for 2014 above.
Adding the PyDev Project(s)
- Make sure that you have the pyDev Perspective active: Window → Open Perspective → Other… → Pydev
- Make sure that the PyDev Package Explorer is open: Window → Show View → Pydev Package Explorer
- In the Pydev Package Explorer, Right click and select New → project → Pydev(folder) → Pydev Project (Click Next)
- Give the project any name in the Project name: field
- Uncheck Use Default which unlocks the Directory path. Click Browse and select the top directory of your tool folder.
- You can choose an interpreter here, but you can change this at will for the project at any time by going to project properties. If you do know which one you prefer, go ahead and set it (maya2014 interpreter, for a Maya tool project for instance)
- Check the “Don’t configure PYTHONPATH (to be done manually later on)”. The reason for this is that our folder contains much more than python code. The python code is in its own folder, which we will add as the PYTHONPATH later on.
- Click Finish
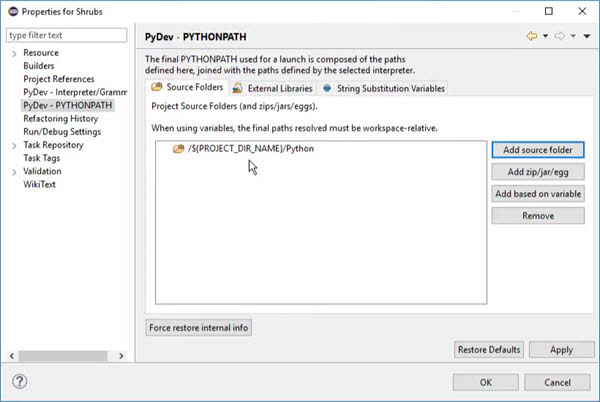
- Right click on your project and select Properties. In the properties window go to Pydev – PYTHONPATH. Add source folders here to your code base for this project. You can also add source folders between projects, by using External Libraries. In my case the source folder is the python folder in my tool folder.
- Rinse and repeat to add as many projects as you want.
- To set and change the interpreter on a project by project basis (Maya Interpreter for any tool depots that relates to Maya & Python Interpreter for external compiled tools for instance). Right click on your project – Properties→ Pydev – Interpreter/Grammar. Pick one of your defined interpreters in the Interpreter drop down.
Adding a PyDev Project to Perforce
- Right click on a project→ Team→ Share Project→ Perforce
- The first time you do this, you have to set up a Server connection – Click Create…
- Put in the server address and user name then click Next.
- Select a workspace and uncheck the “Launch the Perforce Project Import Wizard to import depot folders as Eclipse projects”. Click Finish
- Select the Server connection you created in the drop down and click Finish.
- Now you can right click on any file and the “team” menu item gives you access to perforce commands. Files will automatically be checked out when you open and start to edit them in Eclipse.
Spread the knowledge